More Than a Willing Spirit
The Barathrumites are unconvinced that you will make a worthwhile addition. In order to prove your mettle, they have asked you to delve into the depths of Golgotha to retrieve and restore one of the ![]() scrapped waydroids that litter the cloaca. Unknown dangers writhe in the horrible depths. Live and drink, stranger.
scrapped waydroids that litter the cloaca. Unknown dangers writhe in the horrible depths. Live and drink, stranger.
Recommended
| Level | Abilities | Stats |
|---|---|---|
| 16 | | 9 |
Golgotha Hazards
The infamous Golgotha quest, the destroyer of dreams and the crusher of runs. Indeed, if you play through this quest in the most obvious way, this is a difficult one to succeed. The quest involves you navigating to the bottom stratum of Golgotha, where you must quickly fight your way through its trash-compacting mechanisms and fairly dangerous enemies. There are themes to the kind of environmental hazards you'll face in the trash chutes, which will stay the same as long as you continue to follow the path the conveyor belt takes. Switching conveyor belts will switch hazards connected to them. Each hazard can be EMP'd or quickly destroyed with a source of corrosive gas, so if you have access to these it's worth using them.
Chute Crabs
This hazard will spawn a (nearly) never-ending swarm of ![]() chute crabs every 3 turns until the spawner is destroyed (good luck with that, by the way). While the crabs by themselves are not very dangerous, in groups they are very deadly and they have impressive quickness (150), so they will outspeed you and surround you. They are limited to spawning 30 crabs per ticking vent, which is a considerable amount of crabs especially since there tend to be 4-5 per floor. If you see this configuration, your best chance is to just stay on the belt and run to the bottom. If possible, try to make it to a different conveyor belt, since each one with a
chute crabs every 3 turns until the spawner is destroyed (good luck with that, by the way). While the crabs by themselves are not very dangerous, in groups they are very deadly and they have impressive quickness (150), so they will outspeed you and surround you. They are limited to spawning 30 crabs per ticking vent, which is a considerable amount of crabs especially since there tend to be 4-5 per floor. If you see this configuration, your best chance is to just stay on the belt and run to the bottom. If possible, try to make it to a different conveyor belt, since each one with a ![]() chute crab hazard will drop to another with more
chute crab hazard will drop to another with more ![]() chute crabs, and any hazard is preferable to this one. If for some reason you are favored by crabs, they will be neutral to you and you can stroll through peacefully. However, this probably won't happen.
chute crabs, and any hazard is preferable to this one. If for some reason you are favored by crabs, they will be neutral to you and you can stroll through peacefully. However, this probably won't happen.
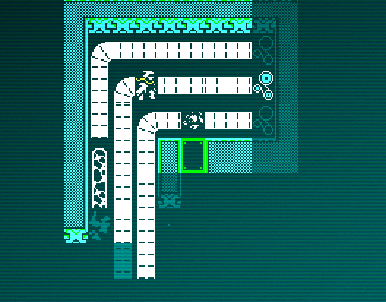
Acid Vents
This hazard will spawn a line of acid every 3 turns that will quickly evaporate into corrosive gas. As long as you're careful, you can easily evade the hazard this spews. The acid will travel along the conveyor belt, and the gas can be mitigated with an item with the "fitted with filters" mod. Since the acid can destroy your gear, try and only be hit by the gas if you're forced between getting hit by the acid or the gas.
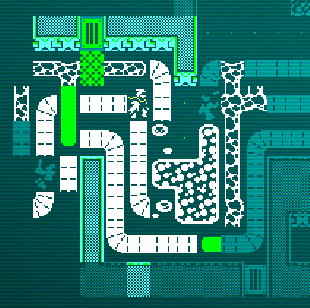
Sparking Vents
These vents will send out a spark of electricity to adjacent tiles every 3 turns. This hazard is the most unpredictable since the electricity will arc and can use the conveyor belt tiles and liquid to propagate its arc. A tile that is safe for one jolt may not be safe from the next as long as it's on the conveyor belt. If you can keep yourself safe from the jolts, this hazard can potentially do more damage to your enemies than you, since it can easily arc and hit more enemies than the other hazards. This one in particular benefits from you hunkering down on a safe non-conveyor belt tile and taking on all comers before traversing to the level below.
Flaming Vents
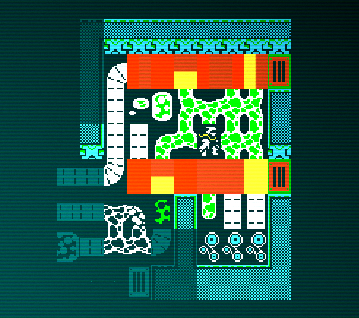
This hazard will shoot out a jet of flame every 3 turns. This makes it the most predictable and simplest to work around of the 4 hazards. However, this hazard type tends to spawn more vents than other hazards. Luckily for us, fire resistance is fairly easy to get early on from Issachar items. With the face and back item and the ![]() Weathered skill, we can get 35% fire resistance which will definitely help if we slip up and take some damage from a vent. If you decide to rest on a non-conveyor tile, be very careful of the reach of these vents, as it's quite far (6 tiles).
Weathered skill, we can get 35% fire resistance which will definitely help if we slip up and take some damage from a vent. If you decide to rest on a non-conveyor tile, be very careful of the reach of these vents, as it's quite far (6 tiles).
If you happen to have ![]() Precognition, use it just before hopping down one of the chutes in order to find out what hazard you'll have, and use it to select the hazard you are most comfortable handling. For the rest of us that can't see the future, we're stuck with what we get.
Precognition, use it just before hopping down one of the chutes in order to find out what hazard you'll have, and use it to select the hazard you are most comfortable handling. For the rest of us that can't see the future, we're stuck with what we get. ![]() Recoiler out if it's too much and try again.
Recoiler out if it's too much and try again.
To the Bottom
Conventional wisdom will tell you to run as fast as you can to the bottom. While this certainly can work, it relies on you being capable of tanking the hits of enemies. The oozes in particular here are quite strong and can stun you as you're trying to run past, so having the ![]() Shake It Off skill is helpful. Mobility skills like
Shake It Off skill is helpful. Mobility skills like ![]() Juke,
Juke, ![]() Charge, and
Charge, and ![]() Jump are very handy to have here in order to put some distance between you and the enemies as you make your mad dash to the bottom. While running by, try and prioritize avoiding melee contact with any ooze, even if that means putting yourself next to a different enemy.
Jump are very handy to have here in order to put some distance between you and the enemies as you make your mad dash to the bottom. While running by, try and prioritize avoiding melee contact with any ooze, even if that means putting yourself next to a different enemy.
While conventional wisdom has you running for your life, my wisdom says something different. If you get the ![]() chute crabs hazard, you're out of luck; have fun running my friend. If you get a different hazard or if you are able to make it to a different conveyor belt, now you have a fighting chance. Your movement skills are now your ticket to terrain that doesn't move. If you can make it here, use your ranged weapons and decent fighting skill by this point to take all comers and heal up at the end of combat. If you can't easily get to stable ground, then don't try and force it: drop to the next floor and see if you have better terrain.
chute crabs hazard, you're out of luck; have fun running my friend. If you get a different hazard or if you are able to make it to a different conveyor belt, now you have a fighting chance. Your movement skills are now your ticket to terrain that doesn't move. If you can make it here, use your ranged weapons and decent fighting skill by this point to take all comers and heal up at the end of combat. If you can't easily get to stable ground, then don't try and force it: drop to the next floor and see if you have better terrain.
The reason for this is that enemies will follow you down the chutes. Running all the way to the bottom prolongs the problem until you get there, it doesn't completely solve it. While there will be enemies that you lose during the process, there is no guarantee that you'll drop somewhere safe. The last thing you want is to drop in danger at the bottom and then have 4 oozes drop on your head because you didn't kill them earlier.

This is a far more damning position to be in than taking the chute slowly and killing everything that moves on stable ground. Not only will we be weakened from tanking attacks, but we will also have likely taken a good bit of damage from hazards as well. Our only option for survival is to keep running, and if we encounter enemies like ![]() Slog or the
Slog or the ![]() agolfly we may just be as good as dead.
agolfly we may just be as good as dead.

While we may encounter extremely deadly scenarios like the one here, we can position ourselves with more control on stable ground to better take on the enemies. While we may need to expend healing resources like salves or witchwood bark, we have the luxury of being able to heal up after and take our time on the conveyor belts, which means we don't take hazard damage.
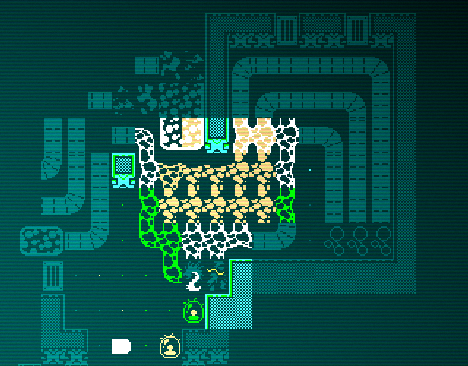
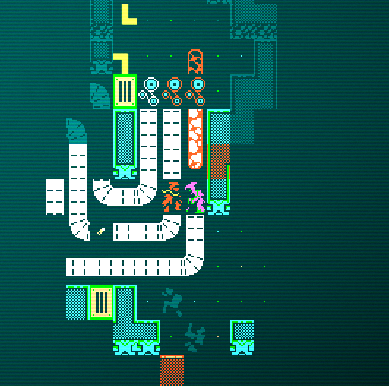
By positioning here, we limit the number of enemies (and more importantly, oozes) that can hit us at once. The green ooze to the northwest is busy running on the treadmill and can't make it to us. The ![]() quillipede will hit the other enemies with quill fling, so we can focus on the ooze that will stun us. We're also just out of range of the flaming vent, but the
quillipede will hit the other enemies with quill fling, so we can focus on the ooze that will stun us. We're also just out of range of the flaming vent, but the ![]() quillipede is not so while we focus on the ooze, the
quillipede is not so while we focus on the ooze, the ![]() quillipede is being roasted. Another great position is further east, next to the conveyor belt. Since the belt is going away from us, it will constantly be pulling enemies away from us, giving us the opportunity to shoot them for free. Enemies that can stay in melee with us end up being roasted by the flaming vent to the north as well.
quillipede is being roasted. Another great position is further east, next to the conveyor belt. Since the belt is going away from us, it will constantly be pulling enemies away from us, giving us the opportunity to shoot them for free. Enemies that can stay in melee with us end up being roasted by the flaming vent to the north as well.
The Cloaca
At the bottom of Golgotha, our mission is to retrieve a broken droid and get out. Once you find one and pick it up, use a ![]() recoiler to get out; don't spend any more time than necessary here. To have the best chance of success, make sure to have neutral reputation with the mollusk faction to neutralize
recoiler to get out; don't spend any more time than necessary here. To have the best chance of success, make sure to have neutral reputation with the mollusk faction to neutralize ![]() Slog as he is a dangerous combatant that can come out of nowhere and crush your hopes and dreams. This is actually fairly easy, even at this point in the game. If you have the
Slog as he is a dangerous combatant that can come out of nowhere and crush your hopes and dreams. This is actually fairly easy, even at this point in the game. If you have the ![]() Two-headed mutation, you can simply wear 2
Two-headed mutation, you can simply wear 2 ![]() electric snail shells. You can buy these from
electric snail shells. You can buy these from ![]() hatters or from
hatters or from ![]() snail farmers at the stilt. If you don't, a single
snail farmers at the stilt. If you don't, a single ![]() electric snail shell and a tiny mollusk reputation boost from water ritual or killing a legendary creature will be sufficient. Finally, if you can find a single snail-encrusted item, that will give you all the rep you need.
electric snail shell and a tiny mollusk reputation boost from water ritual or killing a legendary creature will be sufficient. Finally, if you can find a single snail-encrusted item, that will give you all the rep you need.
Additionally, you ideally have neutral reputation with the fish faction here as well. This can be achieved by water ritualing legendary ![]() glowfish in the salt marsh. If you can find 2 legendary
glowfish in the salt marsh. If you can find 2 legendary ![]() glowfish, that's all the reputation you need. Not only is fish reputation great here, but it's also great at the end game too, so it's a very worthwhile investment. So what exactly is it useful for? The
glowfish, that's all the reputation you need. Not only is fish reputation great here, but it's also great at the end game too, so it's a very worthwhile investment. So what exactly is it useful for? The ![]() sewage eels that spawn from the liquid here are part of the fish faction! If they're neutral with you, they won't try and trip you, making walking through the liquids safe.
sewage eels that spawn from the liquid here are part of the fish faction! If they're neutral with you, they won't try and trip you, making walking through the liquids safe.
If you don't have that neutral fish reputation, then avoid the liquids at all costs. Sometimes, there's no getting around it but avoid going in as much as you can. Getting tripped by the eels here results in some pretty nasty effects, like poison and glotrot. Asphalt cooking effects will boost your chance to save against the trip as well as items with the "fitted with cleats" mod and ![]() magnetized boots. True-kin can use the
magnetized boots. True-kin can use the ![]() anchor spikes cybernetic to prevent tripping entirely. If you have heat abilities or heat cooking effects, you can set the liquid ablaze and evaporate it (just don't walk in the vapor).
anchor spikes cybernetic to prevent tripping entirely. If you have heat abilities or heat cooking effects, you can set the liquid ablaze and evaporate it (just don't walk in the vapor).
The Most Direct Path
Here's the thing, going down the chutes is still quite dangerous and there is an alternative. Once again, we see that ![]() Flight ability on the recommended list, and once again we know there's some cheese in our future. We have a straight shot to the bottom via the hole that the platform uses to take us back to the top, we only need the ability to go down it. The building to the north houses our hole, but unless you have a
Flight ability on the recommended list, and once again we know there's some cheese in our future. We have a straight shot to the bottom via the hole that the platform uses to take us back to the top, we only need the ability to go down it. The building to the north houses our hole, but unless you have a ![]() military security card or
military security card or ![]() Psychometry, you'll need to break down or go through the wall. Going through it with
Psychometry, you'll need to break down or go through the wall. Going through it with ![]() Phasing is easily done; you can get access to the mutation temporarily by cooking with phase silk from the Stilt if you don't have it naturally. If that's not your jam, then you can claw away at a wall with weapons or execute refined demolition with a
Phasing is easily done; you can get access to the mutation temporarily by cooking with phase silk from the Stilt if you don't have it naturally. If that's not your jam, then you can claw away at a wall with weapons or execute refined demolition with a ![]() nanopneumatic jackhammer or a
nanopneumatic jackhammer or a ![]() pickaxe. Once you're in, strap on your
pickaxe. Once you're in, strap on your ![]() mechanical wings, take flight and go down.
mechanical wings, take flight and go down.
If you have perfect ![]() Flight (from
Flight (from ![]() anti-gravity boots or rank 6
anti-gravity boots or rank 6 ![]() Wings), this is perfectly safe to do. If you don't, this is actually not safe to do. With
Wings), this is perfectly safe to do. If you don't, this is actually not safe to do. With ![]() mechanical wings, there is a 5% chance every turn that you will be knocked prone. When this happens above a 5-strata hole, the result is easily about 200 damage. If you want to roll the 5%, by all means, go ahead; I sure have so I won't judge you for it (been killed by it too). There's inherent risk in doing this, but the chance is rather low (around 23% to fall at some point).
mechanical wings, there is a 5% chance every turn that you will be knocked prone. When this happens above a 5-strata hole, the result is easily about 200 damage. If you want to roll the 5%, by all means, go ahead; I sure have so I won't judge you for it (been killed by it too). There's inherent risk in doing this, but the chance is rather low (around 23% to fall at some point).
🗒️ Note: While it's not a strategy I recommend, it's common enough that I may as well mention it. By injecting yourself with a
rubbergum injector, you can halve the damage you take from the fall if you're a mutant or quarter it if you're true kin. This still results in a lot of damage, and there's no guarantee that the landing zone is safe. The ideal is that you combine this with your
Flight if it's not perfect
From here, your trek around the bottom is as it normally would be. The most dangerous part of Golgotha is certainly the chutes, so completely circumventing them makes this quest far more consistent and manageable. Add on mollusk and fish reputation and the only thing that can touch you are the normal enemies, which you certainly should be capable of killing by this point in some way.
Rewards and Illness
Once you have your droid, fix it in safety after recoiling out. Turn in the quest and enjoy your rewards! The quest has 3 tiers of reward based on the level you talk to ![]() Otho at the end:
Otho at the end:
Level
| 12 and Below | 13 - 18 | 19+ |
|---|---|---|
| A | Choice of masterwork scoped | 3 random grenades |
In case it wasn't obvious, we're going for the ![]() carbine (or Sparbine, as it's
carbine (or Sparbine, as it's ![]() Sparafucile's signature weapon). If you want the
Sparafucile's signature weapon). If you want the ![]() chain pistol since you're doing a pistol build, feel free to choose that instead. However, do be warned that you only get a single pistol, not a pair. Whichever you choose, this is why our recommended level is 16; it gives us a nice buffer in case we get more exp than we want during the quest. The
chain pistol since you're doing a pistol build, feel free to choose that instead. However, do be warned that you only get a single pistol, not a pair. Whichever you choose, this is why our recommended level is 16; it gives us a nice buffer in case we get more exp than we want during the quest. The ![]() hologram bracelet is nice to have, but you can't use it if you're dead so leave that for when you have more experience. Whenever I go for the
hologram bracelet is nice to have, but you can't use it if you're dead so leave that for when you have more experience. Whenever I go for the ![]() hologram bracelet, it becomes handy to use the cheesy strategies for these quests as it involves gaining the least amount of EXP (which is sometimes harder to manage than just completing the quest).
hologram bracelet, it becomes handy to use the cheesy strategies for these quests as it involves gaining the least amount of EXP (which is sometimes harder to manage than just completing the quest).
If you happened to contract a sore throat or stiff legs during your time in Golgotha, go to the ovens for a portion of porridge. Don't bother spending the reputation for it; chances are you'll never be diseased outside of this specific quest. You can also ![]() Harvest the yuckwheat nearby for an extra bump in disease resistance, just eat it raw and unprocessed. If you eat the porridge first, make sure to pick a direction for the discharge where there isn't anything so you don't incur the wrath of the Barathrumites.
Harvest the yuckwheat nearby for an extra bump in disease resistance, just eat it raw and unprocessed. If you eat the porridge first, make sure to pick a direction for the discharge where there isn't anything so you don't incur the wrath of the Barathrumites.